The following is a step by step explanation for running one of the password protection .NET sample projects. By following these steps you will be able to run all the .NET samples and also understand how to add password protection to your own applications.
.NET Password Protection Sample "CSharp_1 AnyCPU"
The following is an explanation of the .NET sample program
called "CSharp_1 AnyCPU". It can be found in the following default
Installation location:
C:\Program
Files\ProtectKit3.5\Password Protection\Set Password Protection\For
.NET\Sample Programs (.NET)\CSharp_1 AnyCPU\
For this explanation, I am using a Windows 7 32bit operating
system. If running on a 64 bit operating system, your paths may be
slightly different, though nothing that should cause confusion. I
wanted to keep the sample programs that shipped with the
ProtectKit3.5 in original condition so I created a new folder
called "Run Pro35 Samples" at
"C:\Run Pro35 Samples\"
and then copied the ProtectKit3.5 sample project that I wanted to
run into this folder.
Step 1:
Copy the entire "CSharp_1 AnyCPU" folder from the installation
location given above into the test folder. In my case that is the
"C:\Run Pro35 Samples" directory. Building this project will result
in an EXE file called "CS_Sample1_AnyCPU.exe". I will be building
this project in debug mode so the CS_Sample1_AnyCPU.exe will be
created in the following directory:
"C:\Run Pro35 Samples\CSharp_1
AnyCPU\bin\Debug\"
Step 2:
Copy the necessary ProtectKit3.5 files into the same directory
as the EXE file. This sample will be built with a target platform
of "AnyCPU" and will be able to run in either 32bit or 64bit
operating systems. Therefore, you will need to copy the protection
information files (ProInfo files) for both 32bit and 64bit
applications. Copy the ProInfo32.dll and ProInfo64.dll files into
the same directory as the CSharp_1 AnyCPU.exe. You will find these
ProtectKit3.5 protection information files in this default
installation directory:
C\Program
Files\ProtectKit3.5\Password Protection\ProInfo
Files\
Note: The ProInfo32.dll is for 32 bit applications,
whether they are running on a 32 or 64 bit operating system. The
ProInfo64.dll is for 64 bit applications. The ProInfo32(64).dll
files are the same for .NET applications or Win32(64)
applications.
Next, copy the ProFuncNET32.dll, ProFuncNET64.dll, and
Newtone.ProtectKit.Win.Password.dll files into the same directory
as the EXE file. The ProFuncNET32(64).dll files and
Newtone.ProtectKit.Win.Password.dll file can be found in this
default installation directory:
C:\Program
Files\ProtectKit3.5\Password Protection\Set Password Protection\For
.NET\ProFunc Files (.NET)\
Note: The ProFuncNET32.dll is for 32 bit applications.
The ProFuncNET64.dll is for 64 bit applications. There are two
Newtone.ProtectKit.Win.Password.dll files, one for .NET Framework
2.0 and another built for .NET Framework 4.0. Which
Newtone.ProtectKit.Win.Password.dll you use will depend on the .NET
framework your application is built with.
The ProFuncNET32(64).dll files CANNOT be used with Win32(64) native
applications.
Step 3:
Open the project in Visual Studio.
Rebuild the CS_Sample1_AnyCPU.exe
Close the project.
Step 4:
Set Protection:
1. Open the Set Password Protection Tool for .NET applications.
This tool is called "PrNETSetProtect.exe" and can be found in this
default installation location:
C:\Program
Files\ProtectKit3.5\Password Protection\Set Password Protection\For
.NET\Set Password Protection Tool
(.NET)\PrNETSetProtect.exe
2. Click the "Open" button, and browse to the ProInfo files that
you copied above. They should be in the same directory as the
CS_Sample1_AnyCPU.exe you have just built. In my case that is
here:
"C:\Run Pro35 Samples\CSharp_1
AnyCPU\bin\Debug\"
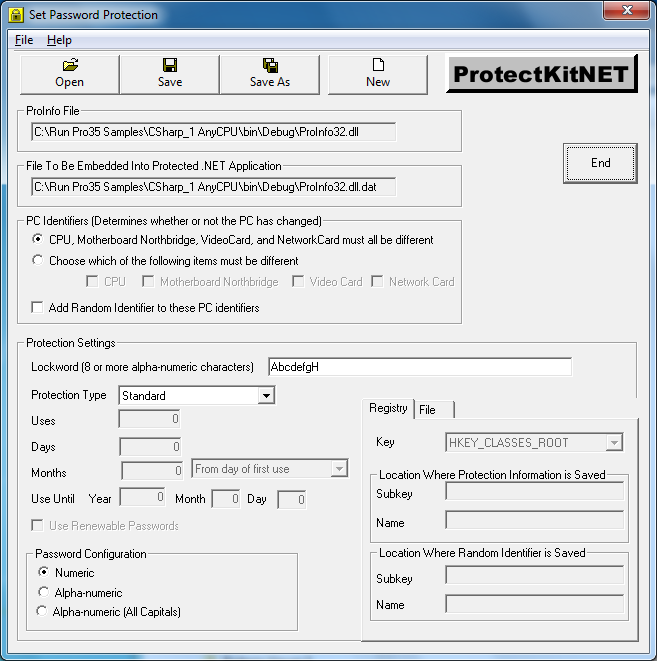
3. Select one of the ProInfo files. If your application is a 32 bit application, use the ProInfo32.dll. If your application is a 64bit application, use the ProInfo64.dll. In this case, the application is AnyCPU so we will need to set protection information into both the ProInfo32.dll and the ProInfo64.dll. We will start by choosing the ProInfo32.dll.
4. Next, choose the PC Indentifiers you want to use. This determines how strictly you want to define the computer's hardware signature. I am accepting the default setting which is the least restrictive.
5. Choose a Lockword. The trial version of the ProtectKit3.5 requires that you use the Lockword "AbcdefgH". I will use this also. In your applications you should choose a different lockword and keep it secret. The lockword must consist of English alphabet (a through z, both lower and upper case) and/or numbers 0 through 9. The lockword must contain at least 8 characters and cannot exceed 64 characters.
6. Choose the Protection Type. Here I am choosing Standard protection which means the application will be locked initially until it is unlocked with a password. Once unlocked, it will run indefinitely.
7. Complete these protection setting by clicking the Save button at the top. A messagebox will appear telling you that the protection has been set. The Set Password Protection tool will add the protection information into the ProInfo32.dll. It will also create another file called ProInfo32.dll.dat whose path is shown. You will embed this file into your application. It is this one to one correspondence between the protection information in ProInfo file and the protection information embedded in the application that enables password protection. Instructions for embedding the ProInfo32.dll.dat file into the application are given below.
8. Before we can embed the protection information into the application, we must repeat the above steps 3 through steps 7 for the ProInfo64.dll. This will set protection information when the application runs as a 64 bit application. Repeating steps 3 through 7 for the ProInfo64.dll will result in the creation of another file called ProInfo64.dll.dat.
NOTE: You can change the name of the ProInfo32.dll file if you want to. You do this by using the Save As button. The New button is essentially the same as the Open button. If you use the Open button with an existing ProInfo32(64).dll, the Set Password Protection Tool will ask you for the Lockword. If you use the New button, it will delete all existing protection settings and start over. The results are essentially the same.
Here is a screenshot of the Set Password Protection Tool with the above settings.
For more details please refer to the explanation for the Set Password Protection Tool For .NET Applications.
Step 5:
Embedding the protection information into the application. After you have used the Set Password Protection Tool a file will be created that you need to embed in your application. Because this application is built in AnyCPU, we have set protection information into the ProInfo32.dll and the ProInfo64.dll files. Two other files, the ProInfo32.dll.dat and the ProInfo64.dll.dat were created. CHOOSE ONE OF THESE FILES to embed in your application. It doesn't matter which one you choose. There are two ways to do this....
1. Open your application project, select the PasswordProtect class. In the Properties window, click on button at the right of the Stream property and set the path to the embedded protection file. (see images below)
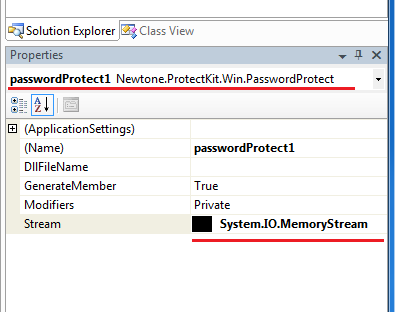

Click the "Open" and the ProInfo32.dll.dat file will be embedded into the application.
2. The other way to embed the ProInfo32.dll.dat file into your application is to open your application project and add the ProInfo32.dll.dat to your project. Then in the Properties Window, set the file's build action to "Embedded Resource". .
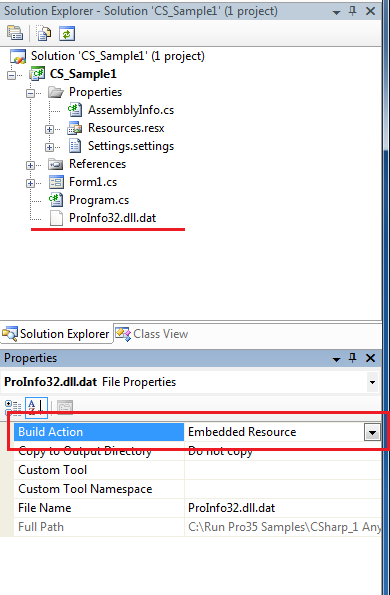
Once you have done this, rebuild your application.
Step 6:
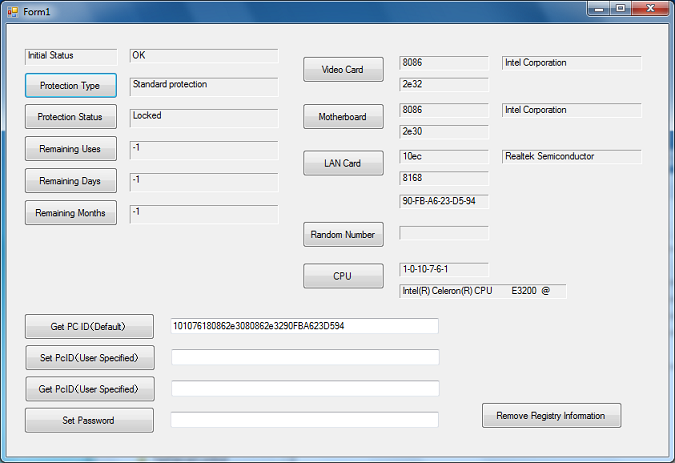
You have now set protection into the application. Try running it. Double click on the CS_Sample1_AnyCPU.exe. You should see something like this....
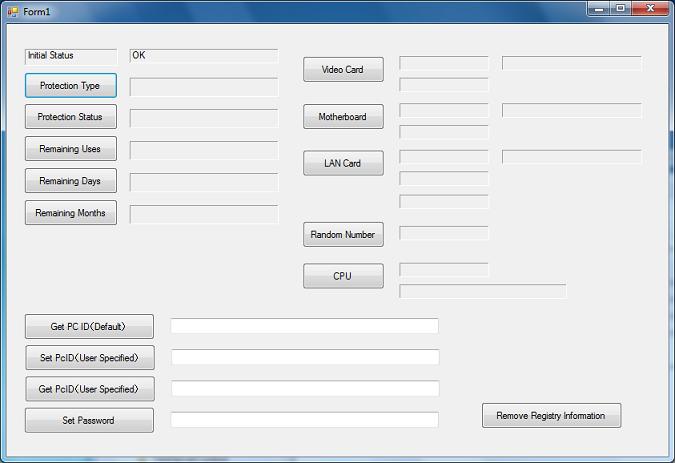
At the top, the Initial Status should say, "OK". This means that the ProtectKit System Driver is properly installed and running, that the ProInfo and ProFuncNET files are where they should be, that the protection information embedded in the application matches that set in the ProInfo file and so on. If you are getting some errors here then see the trouble shooting section.
Click the Protection Type button: It should say "Standard
protection"
Click the Protection Status button: It should say, "Locked"
The other buttons, "Remaining Uses", "Remaining Days", and "Remaining Months" pertain to different protection types and are not relevant. Clicking them will return values of -1.
You can also retrieve the hardware information with this application by clicking the "Video Card", "Motherboard", "LAN Card", "Random Number", and "CPU" buttons. This information is used to create the default Pcid that indentifes the computer running this application.
Here is a screenshot showing this information:
Notice that this application is locked. To unlock the
application, you need to retrieve the PcID and enter it into the
Password Generator. The ProtectKit3.5 has three ways to generate
passwords. In this example we will use the Pr3PassGen.exe. It can
be found in the following deflault directory:
C:\Program
Files\ProtectKit3.5\Password
Protection\PasswordGenerators
Also in this directory, besides the Pr3PassGen.exe, you will see a Pr3PassGen.dll and Pr3PassGen.ocx. These two programable password generating intefaces let you send unlock passwords to your endusers programatically.
1. Double click the
Pr3PassGen.exe.
2. Enter the Lockword, which in our
case is: AbcdefgH
3. Copy the PcID from the
application...To retrieve it click the GetPcID (default)
button.
4. Click the Generate Password
button
5. Copy the Password from the
Password Generator and paste it into the application in the textbox
next to the Set Password button.
6. Click the Set Password button.
This will unlock the application. To check that. Click the Protection Status button again.
The application has now been unlocked and will run indefinitely on this machine. If it is copied to another computer it will stop running.
Please try out other protection types using this sample project.
TroubleShooting:
When this application starts up, under the Form Load event, the passwordProtect1.Initialize method executes. This method starts the Protectkit3.5 and tells you that:
1. The ProtectKit System Driver is
working properly.
2. The protection information in the
application matches the protection information in the
ProInfo32(64).dll.
3. The lockword has been retrieved
from the protection information and it has passed the check.
4. The application is running on a
local drive.
5. There are no other errors.
If you get a messagebox saying this, "ProtectKit isn't
working."
That means the ProtectKit System Driver is not working. This system
driver is installed on the computer where you installed the
ProtectKit3.5. For details about this system driver please refer to
the "ProtectKit System Driver" explanation in the help file of
visit our online help here: ProtectKit
System Driver
If you have deployed this exe to another computer then you will need to install the ProtectKit System Driver there by executing the Ddscm.exe on that computer. You will also need to do this with your own application when you deploy it. Please refer to the explanation of the ProtectKit System driver mentioned above and to Options For DdScm.exe in the help file or here: Options For DdScm.exe
If you get a messagebox saying this, "Unable to read protection
information file."
That means the ProInfo32(64).dll file is not in the same directory
as the application's exe file.
If you get a messagebox saying this, "Lock word is
incorrect."
The lockword retrieved from the protection information embedded in
your application is either incorrect or it hasn't been set yet.
This can happen if you have recompiled your EXE without resetting
protection using the Set Password Protection Tool. For details
about how to set protection see: Set Password Protection Tool for
Win32(64)
If you are getting other types of errors, be sure that the Newtone.ProtectKit.Win.Password.dll is in the same directory as the EXE and that it is the proper .NET Framework version.