To set password protection in .NET applications, follow these steps:
Step 1: Set ProtectKit code in your application.
Step 2: Set protection information using the "Set Password
Protection Tool".
Step 3: Embed the protection file into your application.
Step 4: Obfuscate your application if desired.
Step 5: Digitally sign your application if desired.
Step 6: Deploy Application.
Step 7: Generate a password and send it to the user.
Here is an overview that explains how to set password protection in a .NET application.
.NET Example: (in Visual Basic .NET)
 Step 1: Set
ProtectKit code in your application
Step 1: Set
ProtectKit code in your application
Check the ProtectKit status and the lockword:
You should do this when your application initializes. Here we chose
to do this in the Form_Load event. That way, every time the
application starts up, the passwordProtect Initialize function
executes and checks whether the ProtectKit is running properly or
not. Then the GetLockword function executes and retrieves the
lockword from the application so you can check to see that it is
correct.
Private Sub Form1_Load(ByVal sender As
System.Object, ByVal e As System.EventArgs) Handles MyBase.Load
passwordProtect1.DllFileName = "ProFuncNET32.dll"
Dim ret As Integer =
passwordProtect1.Initialize("VB_Sample1.exe", "ProInfo32.dll")
If (ret <> 0) Then
Select
Case (ret)
Case
-1 : MessageBox.Show("Unable to run application.")
Case
1 : MessageBox.Show("Service is not running.")
Case
2 : MessageBox.Show("Unable to load protection information
file.")
Case
3 : MessageBox.Show("Lockword is incorrect.")
Case
4 : MessageBox.Show("Application must run on a local disk.")
Case
5 : MessageBox.Show("An error has been generated")
End
Select
Me.Close()
End If
Dim s As String =
passwordProtect1.GetLockword()
Dim ChkLockword() As String =
"AbcdefgH"
If (s <> ChkLockword) Then
MessageBox.Show("Lockword
is incorrect.")
Me.Close()
End If
label1.Text = "OK"
End Sub
Retrieve the PC's Hardware Signature (PcID):
The QueryPcID function retrieves the hardware signature of the PC
based on the requirements that set by the Set Password Protection
Tool. This PcID is used to generate a password to unlock the
application on this PC.
Private Sub button1_Click(ByVal sender As
System.Object, ByVal e As System.EventArgs) Handles
button1.Click
textBox1.Text =
passwordProtect1.QueryPcID()
End Sub
Set the Password: After a valid password has been generated, passing that password into the SetPassword function will unlock the application. Here we do that within a button click event.
Private Sub button2_Click(ByVal sender As
System.Object, ByVal e As System.EventArgs) Handles
button2.Click
passwordProtect1.SetPassword(textBox2.Text)
End Sub
Check Protection Status: The QueryProtect function checks the protection status and returns a value based on that status. This allows you to set the appropriate action that will occur based on the protection status return values.
Private Sub button3_Click(ByVal sender As
System.Object, ByVal e As System.EventArgs) Handles
button3.Click
Dim ret As Integer = passwordProtect1.QueryProtect()
Select Case ret
Case -1 : label4.Text = "Unable to run application."
Case 0 : label4.Text = "Application is unlocked."
Case 1 : label4.Text = "Application is locked."
Case 2 : label4.Text = "Exceeded allowable number of uses."
Case 3 : label4.Text = "Exceeded allowable number of days."
Case 4 : label4.Text = "Exceeded allowable number of months."
Case 5 : label4.Text = "Application has expired."
Case 6 : label4.Text = "PC's clock has been turned back."
Case 7 : label4.Text = "PC is different."
Case 8 : label4.Text = "Protection file is incorrect."
Case 9 : label4.Text = "Lockword is incorrect."
Case 10 : label4.Text = "Password is incorrect."
Case 11 : label4.Text = "Other"
Case 12 : label4.Text = "Using an improper protection file."
End Select
'...Other programming code....
End Sub
Step 2: Set protection
information
Use the Set Password Protection tool to set protection information into your application:
This tool writes protection information into a "protection information file" and also writes the same information into a file that is embedded into your application as a resource.
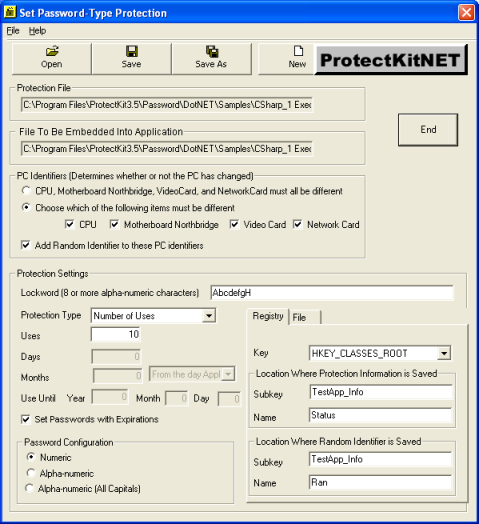
Password protection allows you to enable your applications in a variety of ways. Standard protection locks the application until it is unlocked. "Number of uses", "Number of days", and "Number of months" protection allow you to set how many times the application can be used, or for how many days, or months it will run. "Expiration date" protection sets a date after which the application stops running. The "renewable passwords" feature lets you enable an application that has stopped and it will be enabled again for the specified number of uses, days, or months.
Step 3: Embed the
protection file into your application
In Step 2, the Set Password Protection tool, generated two files; a protection information file and another file containing the protection information that will be embedded in your application. To embed this file, use the Stream property of the PasswordProtect class.
How To Embed Protection Information:
There are two ways to embed the protection information
into your application:
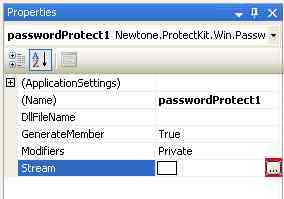
1. Open your application project, select the PasswordProtect
class.
In the Properties window, click on button at the right of the
Stream property (see image below) and set the path to the embedded
protection file.
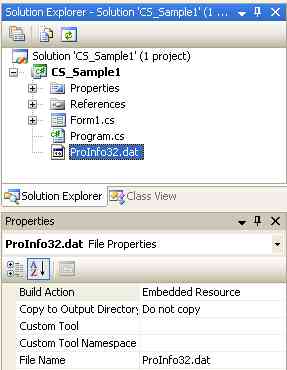
2. Open your application project and add the protection file to
your project.
In the Properties Window, set the file's build action to "Embedded
Resource".
After embedding the protection information, build the
application.
Performing Steps 2 and 3, prior to Step 1, allows you to debug
the protection portion of your code.
Step 4: Obfuscate your
application
If you are obfuscating your compiled application, do that at this step. If you are not obfuscating your application, proceed to Step 5.
We highly recommend that you obfuscate your .NET applications. If your applications and resource files are not obfuscated, program code may be readable if your application is decompiled and your lockword and other protection information may be exposed. Obfuscating your .NET application and resource files using string encryption will prevent your programming code and protection information from being exposed.
Step 5: Digital
signature
If you are digitally signing your application, do that at this step. If you are not digitally signing your application, proceed to Step 6.
Step 6: Deploy your
application
Deploy your application and all its associated files to the target machine.
Step 7: Generate a
password to unlock the application and send it the user
Three types of Password Generators
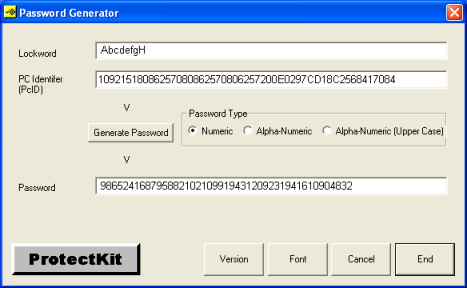
The ProtectKit3.5 includes three password generating programs. The runtime Password Generator (EXE) is an application that allows you to enter a lockword and a PcID to generate a password manually, without any need for programming. Using the lockword from Step 2 and the PcID retrieved from the enduser's PC, you can generate an unlock password, which you send to the enduser to unlock the application.
The Password Generator EXE
The Password Generator OCX and DLL files
These files provide the password generating functions in an easy to use API. This allows you to generate passwords programmatically using the lockword and retrieved PcID. You can also send the generated passwords to your users. These programming API allow you to do this seamlessly.
Below is sample code from a web application that uses VBScript to generate the password.
Set objCOM =
Server.CreateObject("Pr3PassGen.PassGen")
objCOM.LockWord = varLockword
objCOM.PCID = varPCID
objCOM.PasswordType = varType
varUnlockword = objCOM.PS3GetPassword
Set objCOM = nothing
Here is Visual Basic code that uses the EMail API
ret = PS3SendMail("msv.newtone.co.jp",
"info@newtone.co.jp", _
"NEWTONE", "paul@company.com", "Users", _
"PassWord Information", "Below is the password needed to
unlock....")