Using the Web ImageKit Control in Visual Studio 2005
A. Create New Web Project
1. Open VS2005, select New Project
2. Select Visual C#, Web, ASP.NET Web
Application
3. Name the project and click OK
4. Add the ImageKit WPF Controls to the
Toolbox
B. Add ImageKit Web Control to the web form
1. Drag the ImageKit Control from the
toolbox onto the Web Form.
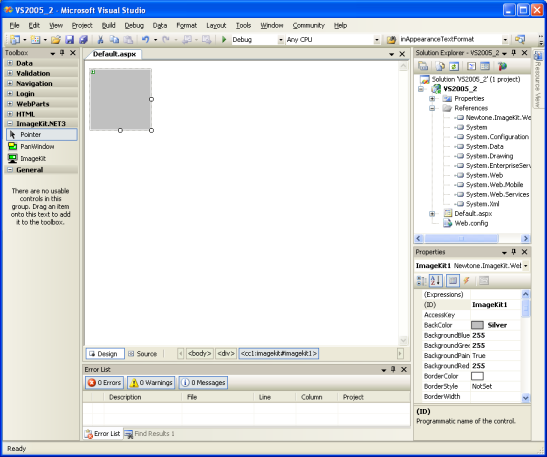
By default it will be placed in the top
left corner of the form in its default size.
Before changing its size and its location
on the form, change its Style:Position property to Absolute. See
next step.
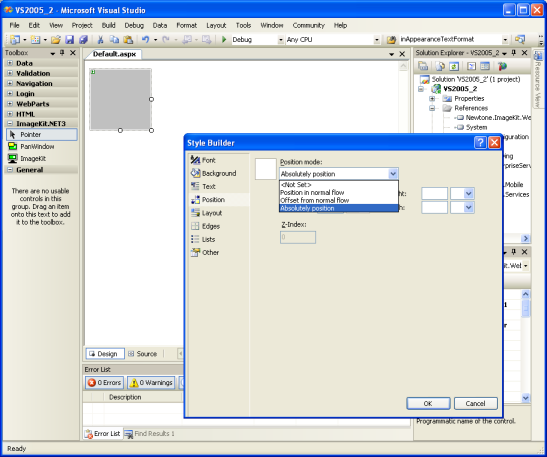
2. Set the position of the ImageKit
Control to ABSOLUTE
a. From the
FORMAT menu, select STYLE
b. In the
Style Builder dialog, select Position in the left pane
c. In the
right pane, under Position Mode, select Absolute from the drop down
menu.
d. Click
OK
3. You may now use the mouse to resize the
ImageKit Control and set its location on the form
4. In the Solution Explorer, make sure
there is a reference to the following assemblies:
Newtone.ImageKit.Web.ImageKit
Newtone.ImageKit.Common
Newtone.ImageKit.File
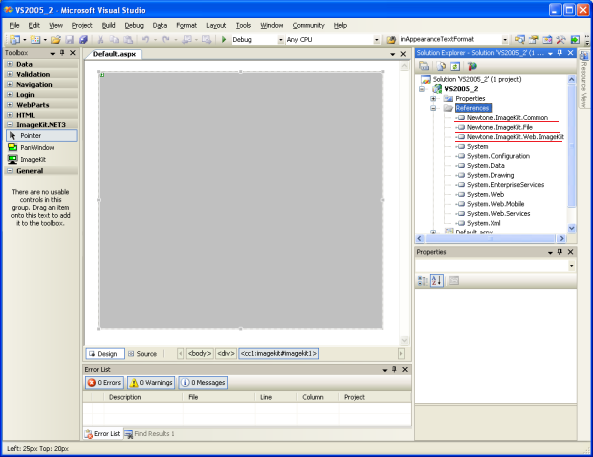
If any of these assemblies are not referenced, add references to
them by right clicking "References" in the Solution Explorer and
selecting "Add Reference" then browsing to the appropriate
assembly.
C. Set the Http Handler. The Web ImageKit Control uses an Http
Handler defined by the Newtone.Web.IkStream class. This class
allows image data to be displayed within the ImageKit Control.
There are two ways to add the HTTP Handler to your project.
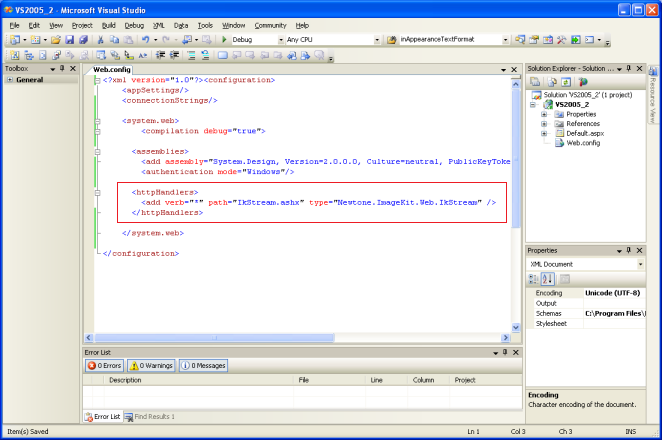
1. The easiest way to add the Http Handler
to the Web.Config file.
a. To do
this add the following tag to the web.config file
<system.web>
<httpHandlers>
<add verb="*" path="IkStream.ashx"
type="Newtone.ImageKit.Web.IkStream" />
</httpHandlers>
</system.web>
2. Another way to add the Http Handler is to copy the
IkStream.ashx file to the project's root directory. The
IkStream.ashx file can be found in the folder called "System" under
the directory where the ImageKit WPF was installed. After you have
copied this file to your project's root directory, then add it to
the project. In the Solutions Explorer, right click on the project
and choose "add existing item". Browse to the IkStream.ashx file,
select it and add it to the project.
D. Set code to display the image when the page loads...
1. In the Page_Load event, set the
following code.
protected void Page_Load(object sender, EventArgs e)
{
ImageKit1.Url = "Image1.jpg";
ImageKit1.LoadImageFromFile(Newtone.ImageKit.LoadFileType.Load);
ImageKit1.ScrollBars = true;
ImageKit1.Display(Newtone.ImageKit.Web.DisplayMode.ActualSize);
}
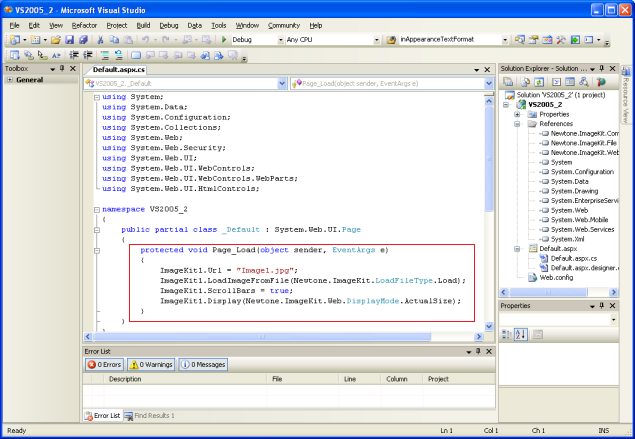
Make sure that Image1.jpg is in the root directory of the web application or within a sub directory within the scope of the web application's virtual directory. The above code will load "Image1.jpg" and display it in the Web.ImageKit control in actual size with scroll bars.
IMPORTANT POINTS TO KEEP IN MIND:
1. Image must be in a path accessible by the virtual directory
where the ImageKit Control runs. This means the image must be in
the web application's root directory or in a sub directory below
this root. Physical paths or virtual paths not accessbile by the
web application will not be able to resolve the path and the image
will not be displayed.
2. Make sure the Http Handler is working by adding the Http Handler
to the web.config or by adding the IkStream.ashx file to the
project.