How to install the ImageKit
After downloading the ImageKit, double click the "setup.exe" file
and follow the instructions.
Folder structure after installation
After running the ImageKit setup program, the following folders
will be created.
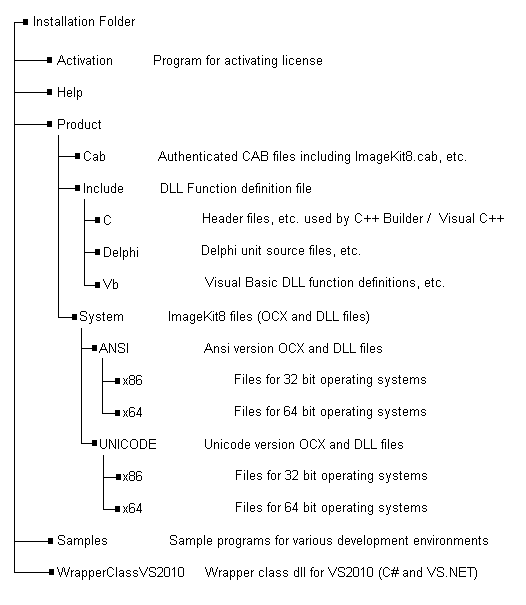
ImageKit8 files
1) OCX
32 bit Unicode Version
ImageKit8.ocx, ImageKit8Thumb.ocx
32 bit Ansi Version
ImageKit8A.ocx,
ImageKit8ThumbA.ocx
64 bit Unicode Version
ImageKit864.ocx,
ImageKit8Thumb64.ocx
64 bit Ansi Version
ImageKit864A.ocx,
ImageKit8Thumb64A.ocx
2) DLL
32 bit Unicode Version
Ik8Com.dll
Ik8Effect.dll
Ik8File.dll
Ik8Bmp.dll
Ik8Dxf.dll
Ik8Emf.dll
Ik8Fpx.dll
Ik8Gif.dll
Ik8J2k.dll
Ik8Jpeg.dll
Ik8Pcx.dll
Ik8Png.dll
Ik8Svg.dll
Ik8SxfP21.dll
Ik8SxfSfc.dll
Ik8Tiff.dll
Ik8TransFile.dll
Ik8Wmf.dll
Ik8Print.dll
Ik8RasToVect.dll
Ik8Scan.dll
Ik8VectCom.dll
32 bit Ansi Version
Ik8ComA.dll
Ik8EffectA.dll
Ik8FileA.dll
Ik8BmpA.dll
Ik8DxfA.dll
Ik8EmfA.dll
Ik8FpxA.dll
Ik8GifA.dll
Ik8J2kA.dll
Ik8JpegA.dll
Ik8PcxA.dll
Ik8PngA.dll
Ik8SvgA.dll
Ik8SxfP21A.dll
Ik8SxfSfcA.dll
Ik8TiffA.dll
Ik8TransFileA.dll
Ik8WmfA.dll
Ik8PrintA.dll
Ik8RasToVectA.dll
Ik8ScanA.dll
Ik8VectComA.dll
64 bit Unicode Version
Ik8Com64.dll
Ik8Effect64.dll
Ik8File64.dll
Ik8Bmp64.dll
Ik8Dxf64.dll
Ik8Emf64.dll
Ik8Fpx64.dll
Ik8Gif64.dll
Ik8J2k64.dll
Ik8Jpeg64.dll
Ik8Pcx64.dll
Ik8Png64.dll
Ik8Svg64.dll
Ik8SxfP2164.dll
Ik8SxfSfc64.dll
Ik8Tiff64.dll
Ik8TransFile64.dll
Ik8Wmf64.dll
Ik8Print64.dll
Ik8RasToVect64.dll
Ik8Scan64.dll
Ik8VectCom64.dll
64 bit Ansi Version
Ik8Com64A.dll
Ik8Effect64A.dll
Ik8File64A.dll
Ik8Bmp64A.dll
Ik8Dxf64A.dll
Ik8Emf64A.dll
Ik8Fpx64A.dll
Ik8Gif64A.dll
Ik8J2k64A.dll
Ik8Jpeg64A.dll
Ik8Pcx64A.dll
Ik8Png64A.dll
Ik8Svg64A.dll
Ik8SxfP2164A.dll
Ik8SxfSfc64A.dll
Ik8Tiff64A.dll
Ik8TransFile64A.dll
Ik8Wmf64A.dll
Ik8Print64A.dll
Ik8RasToVect64A.dll
Ik8Scan64A.dll
Ik8VectCom64A.dll
In order to use the ImageKit dll functions, the ImageKit dll files
must be copied into a folder with a valid path or copied into the
current folder.
Steps following installation
After installing the ImageKit, the following steps are needed in
order to use the ActiveX control in a development container. (When
using only DLL functions, these steps are not necessary).
Adding the ImageKit8 to the development environment
1. In VisualBasic 6.0
a. From the Project (P) menu, select "Components" (O)
b. In the Control tab of the "Components" dialog box, select
"ImageKit8 ActiveX Control (Ansi version only)" and "ImageKit8
Thumbnail ActiveX Control (Ansi version only)". Then click the "OK"
button.
2. In Visual C++ 6.0
a. From the Project (P) menu, move the mouse cursor to "Add to
Project" (A) and select "Components and Controls" (P)
b. From the "Components and Controls Gallery" select "Registered
ActiveX Controls"
c. Choose the ImageKit8 control (Ansi version only) that you want
to add and click the "Insert" button
3. In VisualBasic.NET, and VisualC#.NET, VisualC++.NET
a. From the "Tools" menu click on "Add/Remove Toolbox Items"
b. Select the "COM Components" tab and then select the ImageKit8
control you want to add (Unicode or Ansi version). Click the OK
button.
* Note: When the ImageKit8 is installed, the ImageKit8 32 bit Ansi
version and ImageKit8 32 bit Unicode version are both automatically
registered. If you would like to use the 64 bit versions, please
register the 64 bit versions.
Registering or Unregistering the ImageKit8
To manually register or unregister the ImageKit8, execute the
following functions from "Run" the Start Menu
(To Register) REGSVR32 "[path]\ImageKit8.ocx"
(To Unregister) REGSVR32 "[path]\ImageKit8.ocx" /U
Where [path] is the path to the ImageKit8 ocx
The same procedure is used to register or unregister the ImageKit8
Thumbnail control.