The Cursor button

The Cursor button selects a vector data element and, if "drag and scroll" is enabled, allows the element to be moved with the mouse.
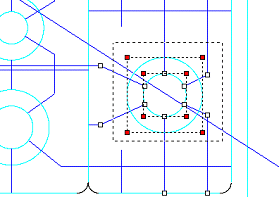
Using the Cursor button
- Click the Cursor button on the Image Editing Toolbar.
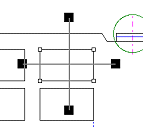
- Click on the vector image element that you would like to
select. The selected element will be highlighted by small squares.
To select more than one element at the same time, hold the [Shift]
key down while clicking the elements you want to select.
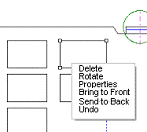
- By right clicking on the select element, you can display the menu list and choose the functions that you want to perform on that element.
- To delete an element, click [delete].
- To rotate an element, click [rotate] and drag the rotation
guides.
Rotation Guides
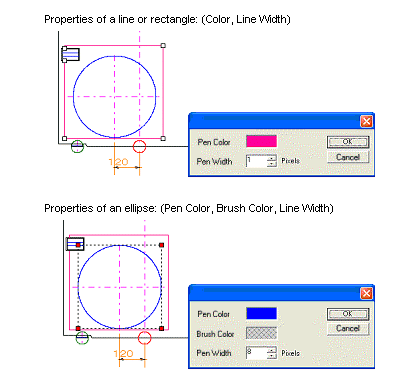
- To display or change an vector element's properties, click
[Properties].
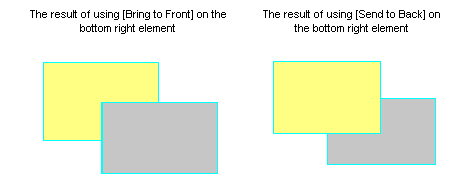
- You can place an element on top of other elements or behind
other elements by selecting [Bring to Front] or [Send to Back] from
the menu list
The Zoom button

The Zoom button increases or decreases the magnification level of the image allowing you to view the image from close up or from far away.
Image magnification: With the Zoom button you can change the magnification at which you view the image from 1/20 to 20 times normal size. This means that an image viewed at maximum magnification looks 20 times larger than the original whereas the same image viewed at minimum magnification looks 1/20th as large.
Using the Zoom button
- Click the Zoom button on the Image Editing Toolbar.
- Increase or decrease the magnification of an image in the ImageKit Control by using the left or right mouse buttons. To increase magnification, click on the image with the left mouse button. This will increase the magnification by one step. To decrease the magnification of an image, click on the image with the right mouse button. This will decrease the magnification by one step. The location on the image where you clicked the mouse will be centered within the ImageKit Control.
Note: The Zoom button can only be used when the display mode is set to "Actual size" display.
The Select button

The Select button creates a rectangular selection area on the
image.
In general, this selected area can be copied and pasted in a
different location or on a different image, the selected area can
be moved or rotated, etc.
Using the Select tool
- Click the Select button on the Edit Toolbar.
- Place the mouse cursor on the corner of the area that you would like to select.
- Click and drag the mouse until the selected area is the size that you want then release the mouse button. As the mouse moves, a line will appear to indicate the border of the selected area.
- Once the selected area has been determined, you can clear it by clicking the left mouse button inside the selected area. To move the selected area, place the mouse cursor within the selected area and drag the mouse.
Note: When an area is selected on the image, the border of the selected area becomes visible and the various vector data elements (lines, ellipses, etc) that are inside the selected area are highlighted. For ellipses that are inside or partially inside the selected area, the border of a rectangle that bounds the ellipse will be displayed and a red square placed on each of that rectangles four corners. For lines that are inside or partially inside the selected area, a white square will be placed at either end of the line.
The Rectangle button

Draws a rectangle on the image. For DXF format, the rectangle will only be in outline format and can not be filled with color.
Using the Rectangle tool
- Click the Rectangle button.
- Set the foreground color (If you are using fill, then the background color should also be set)
- Set the style(outline, fill, both)
- Select square or rectangle
- Place the mouse at the corner of the area that you want to make the rectangle.
- Drag the mouse until the rectangle is the proper size.
- Release the mouse button.
The Ellipse button

Draws an ellipse on the image. For DXF format, the ellipse will only be in outline format and cannot be filled with color.
Using the Ellipse tool
- Click the ellipse button.
- Set the color and style
- Choose whether you want a circle or ellipse.
- Place the mouse in the center of the area that you want to make an ellipse.
- Drag the mouse until the ellipse is the proper size.
- Release the mouse.
The RoundRect button

Draws a rounded rectangle on the image. (Cannot be used with DXF file format)
Using the RoundRect tool
- Click the RoundRect button.
- Set the color and style.
- Select square or rectangle.
- Place the mouse on the corner of the area where you want to make a rounded rectangle.
- Drag the mouse until the rounded rectangle is the proper size.
- Release the mouse button.
The Line button

Draws a straight line on the image.
Using the Line tool]
- Click the Line button.
- Set the color and width of the line.
- Click the mouse at the point where you want the line to begin.
- Drag the mouse to the point where you want the line to end.
- Release the mouse button.
The Polyline button

Draws a polyline on the image.
Using the Polyline tool
- Click the Polyline button.
- Set the color and width of the line.
- Click the mouse at the point where you want the polyline to begin.
- Drag the mouse to the point where you want the first segment of the polyline to end and release the mouse button. This point is the starting point of the next segment.
- Drag the mouse again to draw the next segment and release the mouse button. Repeat until you have drawn the polyline.
The Polygon button

Draws a polygon (closed polyline) on the image. For DXF format, the polygon will only be in outline format and cannot be filled with color.
Using the Polygon tool]
- Click the Polyline button.
- Set the foreground color (If you are using fill, then the background color should also be set)
- Set the style (outline, fill, both)
- Click the mouse at the point where you want the polygon to begin.
- Drag the mouse to the next point of the polygon. Release the mouse button and the first segment of the polygon will be completed. This point is the starting point of the next segment.
- Drag the mouse again to draw the next point and release the mouse button. Repeat until you have drawn all the points of the polygon. To close the polygon, move the mouse without pressing a button and the final segment will be drawn.
The Image button

The Image button loads a raster image and pastes it on the vector image at a specified location. There are two ways to do this. Note: DXF file formats cannot use this tool.
Loading an image into an area of a specified size
Using the Image tool
- Click the Image button.
- Place the mouse cursor in the location where you would like the raster image to be pasted. Drag the mouse to specify the size of the area in which the image will be loaded.
- When you release the mouse the "Open File" dialog will appear. Select the image that you want to load.
- The image will be loaded into the area that you specified and displayed.
Loading an image of original size
Using the Image tool
- Click the Image button.
- Click the mouse cursor in the location where you would like the raster image to be pasted.
- The "Open" file dialog box will appear. Select the image that you want to load.
- The image will be loaded and pasted with the top left corner of the raster image at the location of the mouse click.
Text button and Font button


Allows you to use a text box to add text to an image.
Using the Text tool
- Click the Text button.
- Click the mouse in the location where you want the text to begin and drag the mouse to create a textbox.
- Enter the text string that you want to place on the image. To start a new line of text, press the [Ctrl] + [Enter] keys.
- Once you have entered the text, click the [Enter] key and the
textbox will be replaced with a selected area that has a dotted
border. At this point, you can do the following:
Move the text by dragging the selected area. Note that clicking outside of the selected area will add the text to the image.
Change the color of the text and the background color.
Double click inside the selected area and the text can be edited again.
Click the [Font] button on the Edit Toolbar and change the text font name, style or size. - To add the text to the image, click outside of the selected area.