Preparation for installing ImageKit10 VCL
The following must be present on your PC before you can use the ImageKit10 VCL
1) .NET Framework 4.0: The ImageKit10 VCL license
activation program requires .NET Framework 4.0.
Please be sure that .NET Framework 4.0 is installed before
installing the ImageKit10 VCL
2) Microsoft Visual C++ 2019 Redistributable Package: This is required by the ImageKit10 VCL's DLL files.
* NOTE: For both 1) and 2) above, there are 32bit (x86) and 64bit (x64) versions. Please make sure that you have installed the appropriate 32 bit and 64 bit versions before installing the ImageKit10 VCL.
How to install the ImageKit10 VCL
After downloading the ImageKit10 VCL, run the installation program under administrator permissions.
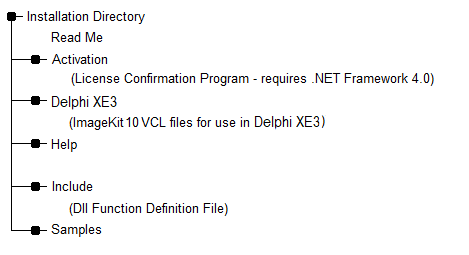
Folder structure after installation
After running the ImageKit10 VCL installation program, the following folders will be created. (This is an example for Delphi XE3)
Using ImageKit10 DLL Version
To use the ImageKit10 DLL version, copy the ImageKit10 DLL files, found in the folder called "System" under the directory where the ImageKit10 VCL was installed, into a folder with a valid path or copy them into the same folder as your application. Use the DLL definition file, found in folder called "Include" under the directory where the ImageKit10 VCL was installed. For Delphi XE3 and above and for C++Builder XE3 and above, there are 64 bit DLL files as well so please copy the appropriate DLL files depending on whether your application is 32 bit or 64 bit.
Using ImageKit10 VCL Component Version
Remove earlier versions of the ImageKit VCL
Before using the ImageKit10 VCL component, please remove earlier versions of the ImageKit VCL (ImageKit6 VCL, ImageKit7 VCL, ImageKit8 VCL, ImageKit9 VCL).
Load the ImageKit10 VCL into the development environment
To use the ImageKit10 VCL component you must load the component into the development environment. To do that, copy the necessary files from the downloaded ImageKit10 VCL folders into the corresponding folders in the development environment. For details, please refer to the explanations for each development environment given below.
In the explanations below the "Windows System folder" can refer
to several different folders depending on the operating system. On
a 32 bit operating system, this is the Windows\System32 folder. On
a 64bit operating system, this is the Windows\System32 folder for
64 bit files and the Windows\SysWOW64 folder for 32 bit files. The
"Delphi" or "C++Builder" "Bin, Include, and Lib" folders refer to
those folders under the directory where the development environment
is installed. Example: If you installed Delphi XE3 in the
C:\Program Files (x86)\Embarcadero\RAD Studio\10.0 folder then
The Bin folder is C:\Program Files (x86)\Embarcadero\RAD
Studio\10.0\bin
The Lib folder is C:\Program Files (x86)\Embarcadero\RAD
Studio\10.0\lib
Delphi 12 Athens:
Installing in 64 bit Windows:
The "ImageKit10 VCL Delphi 12 Athens" refers to the directory where the ImageKit10 VCL Delphi 12 Athens is installed.
1. Copy all of the files from the ImageKit10 VCL Delphi12Athens\Bin folder into the Delphi 12 Athens bin folder. Copy the files from the ImageKit10 VCL Delphi12Athens\Bin64 folder to the Delphi 12 Athens bin64 folder. Copy all the files from the ImageKit10 VCL Delphi12Athens\Lib\Win64 folder into the Delphi 12 Athens lib\win64\release folder. Copy all the files from the ImageKit10 VCL Delphi12Athens\Lib\Win32 folder into the Delphi 12 Athens lib\win32\release folder. Copy all the files from the ImageKit10 VCL Delphi12Athens\System\Win64 folder into the Windows\System folder. Copy all the files from the ImageKit10 VCL Delphi12Athens\System\Win32 folder into the Windows\SysWOW64 folder.
2. Run Delphi 12 Athens (or Embarcadero RAD Studio 12 Athens) and select "Component" - "Install Package" menu.
3. In Design Time Packages, click the "Add" button and select the DclIk10D29.bpl, DclIk10ThumbD29.bpl, and DclIk10WebCamD29.bpl files that you copied to the Delphi 12 Athens bin folder. Select the "Open" button. This will register the design time packages. If successful, the runtime packages will also be registered. Select the [OK] button and close the dialog. The ImageKit icon will appear in the tool palette.
If you are using the 64-bit IDE, please follow the steps below:
5. Start Delphi 12 Athens (64-bit) (or Embarcadero RAD Studio Delphi 12 Athens (64-bit)) and choose the “Component” – “Install Packages” menu.
6. In “Design-time Packages”, click the “Add (A)” button, specify the following files copied into the Delphi 12 Athens bin64 folder: DclIk10D29.bpl, DclIk10ThumbD29.bpl, DclIk10WebCamD29.bpl, then click the “Open” button. (If successful, the packages will also be registered in the run-time packages.)
7. Click the “OK” button to close the dialog. Icons will appear under “ImageKit” in the Tool Palette.
Installing in 32 bit Windows:
You can follow the same steps as A-1 through A-4, but you do not need to copy the files in Delphi12Athens\Bin64, Delphi12Athens\Lib\Win64, or the files contained in Delphi12Athens\System\Win64. Also, copy the files in Delphi12Athens\System\Win32 into the Windows system folder.
Delphi 11 Alexandria:
Installing in 64 bit Windows:
The "ImageKit10 VCL Delphi 11 Alexandria" refers to the directory where the ImageKit10 VCL Delphi 11 Alexandria is installed.
1. Copy all of the files from the ImageKit10 VCL Delphi11Alexandria\Bin folder into the Delphi 11 Alexandria bin folder. Copy all the files from the ImageKit10 VCL Delphi11Alexandria\Lib\Win64 folder into the Delphi 11 Alexandria lib\win64\release folder. Copy all the files from the ImageKit10 VCL Delphi11Alexandria\Lib\Win32 folder into the Delphi 11 Alexandria lib\win32\release folder. Copy all the files from the ImageKit10 VCL Delphi11Alexandria\System\Win64 folder into the Windows\System folder. Copy all the files from the ImageKit10 VCL Delphi11Alexandria\System\Win32 folder into the Windows\SysWOW64 folder.
2. Run Delphi 11 Alexandria (or Embarcadero RAD Studio 11 Alexandria) and select "Component" - "Install Package" menu.
3. In Design Time Packages, click the "Add" button and select the DclIk10D28.bpl, DclIk10ThumbD28.bpl, and DclIk10WebCamD28.bpl files that you copied to the Delphi 11 Alexandria bin folder. Select the "Open" button. This will register the design time packages. If successful, the runtime packages will also be registered. Select the [OK] button and close the dialog. The ImageKit icon will appear in the tool palette.
Installing in 32 bit Windows:
The procedure is the same as above except that it isn't necessary to copy files from the ImageKit10 VCL Delphi11Alexandria\Lib\Win64 folder or the ImageKit10 VCL Delphi11Alexandria\System\Win64 folder. Also, the files in the ImageKit10 VCL Delphi11Alexandria\System\Win32 folder should be copied to the Windows\System folder.
Delphi 10.4 Sydney:
Installing in 64 bit Windows:
The "ImageKit10 VCL Delphi 10.4 Sydney" refers to the directory where the ImageKit10 VCL Delphi 10.4 Sydney is installed.
1. Copy all of the files from the ImageKit10 VCL Delphi10_4Sydney\Bin folder into the Delphi 10.4 Sydney bin folder. Copy all the files from the ImageKit10 VCL Delphi10_4Sydney\Lib\Win64 folder into the Delphi 10.4 Sydney lib\win64\release folder. Copy all the files from the ImageKit10 VCL Delphi10_4Sydney\Lib\Win32 folder into the Delphi 10.4 Sydney lib\win32\release folder. Copy all the files from the ImageKit10 VCL Delphi10_4Sydney\System\Win64 folder into the Windows\System32 folder. Copy all the files from the ImageKit10 VCL Delphi10_4Sydney\System\Win32 folder into the Windows\SysWOW64 folder.
2. Run Delphi 10.4 Sydney (or Embarcadero RAD Studio 10.4 Sydney) and select "Component" - "Install Package" menu.
3. In Design Time Packages, click the "Add" button and select the DclIk10D27.bpl, DclIk10ThumbD27.bpl, and DclIk10WebCamD27.bpl files that you copied to the Delphi 10.4 Sydney bin folder. Select the "Open" button. This will register the design time packages. If successful, the runtime packages will also be registered. Select the [OK] button and close the dialog. The ImageKit icon will appear in the tool palette.
Installing in 32 bit Windows:
The procedure is the same as above except that it isn't necessary to copy files from the ImageKit10 VCL Delphi10_4Sydney\Lib\Win64 folder or the ImageKit10 VCL Delphi10_4Sydney\System\Win64 folder. Also, the files in the ImageKit10 VCL Delphi10_4Sydney\System\Win32 folder should be copied to the Windows\System32 folder.
Delphi 10.3 Rio:
Installing in 64 bit Windows:
The "ImageKit10 VCL Delphi 10.3 Rio" refers to the directory where the ImageKit10 VCL Delphi 10.3 Rio is installed.
1. Copy all of the files from the ImageKit10 VCL Delphi10_3Rio\Bin folder into the Delphi 10.3 Rio bin folder. Copy all the files from the ImageKit10 VCL Delphi10_3Rio\Lib\Win64 folder into the Delphi 10.3 Rio lib\win64\release folder. Copy all the files from the ImageKit10 VCL Delphi10_3Rio\Lib\Win32 folder into the Delphi 10.3 Rio lib\win32\release folder. Copy all the files from the ImageKit10 VCL Delphi10_3Rio\System\Win64 folder into the Windows\System32 folder. Copy all the files from the ImageKit10 VCL Delphi10_3Rio\System\Win32 folder into the Windows\SysWOW64 folder.
2. Run Delphi 10.3 Rio (or Embarcadero RAD Studio 10.3 Rio) and select "Component" - "Install Package" menu.
3. In Design Time Packages, click the "Add" button and select the DclIk10D26.bpl, DclIk10ThumbD26.bpl, and DclIk10WebCamD26.bpl files that you copied to the Delphi 10.3 Rio bin folder. Select the "Open" button. This will register the design time packages. If successful, the runtime packages will also be registered. Select the [OK] button and close the dialog. The ImageKit icon will appear in the tool palette.
Installing in 32 bit Windows:
The procedure is the same as above except that it isn't necessary to copy files from the ImageKit10 VCL Delphi10_3Rio\Lib\Win64 folder or the ImageKit10 VCL Delphi10_3Rio\System\Win64 folder. Also, the files in the ImageKit10 VCL Delphi10_3Rio\System\Win32 folder should be copied to the Windows\System32 folder.
Delphi 10.2 Tokyo:
Installing in 64 bit Windows:
The "ImageKit10 VCL Delphi 10.2 Tokyo" refers to the directory where the ImageKit10 VCL Delphi 10.2 Tokyo is installed.
1. Copy all of the files from the ImageKit10 VCL Delphi10_2Tokyo\Bin folder into the Delphi 10.2 Tokyo bin folder. Copy all the files from the ImageKit10 VCL Delphi10_2Tokyo\Lib\Win64 folder into the Delphi 10.2 Tokyo lib\win64\release folder. Copy all the files from the ImageKit10 VCL Delphi10_2Tokyo\Lib\Win32 folder into the Delphi 10.2 Tokyo lib\win32\release folder. Copy all the files from the ImageKit10 VCL Delphi10_2Tokyo\System\Win64 folder into the Windows\System32 folder. Copy all the files from the ImageKit10 VCL Delphi10_2Tokyo\System\Win32 folder into the Windows\SysWOW64 folder.
2. Run Delphi 10.2 Tokyo (or Embarcadero RAD Studio 10.2 Tokyo) and select "Component" - "Install Package" menu.
3. In Design Time Packages, click the "Add" button and select the DclIk10D25.bpl, DclIk10ThumbD25.bpl, and DclIk10WebCamD25.bpl files that you copied to the Delphi 10.2 Tokyo bin folder. Select the "Open" button. This will register the design time packages. If successful, the runtime packages will also be registered. Select the [OK] button and close the dialog. The ImageKit icon will appear in the tool palette.
Installing in 32 bit Windows:
The procedure is the same as above except that it isn't necessary to copy files from the ImageKit10 VCL Delphi10_2Tokyo\Lib\Win64 folder or the ImageKit10 VCL Delphi10_2Tokyo\System\Win64 folder. Also, the files in the ImageKit10 VCL Delphi10_2Tokyo\System\Win32 folder should be copied to the Windows\System32 folder.
Delphi 10.1 Berlin:
Installing in 64 bit Windows:
The "ImageKit10 VCL Delphi 10.1 Berlin" refers to the directory where the ImageKit10 VCL Delphi 10.1 Berlin is installed.
1. Copy all of the files from the ImageKit10 VCL Delphi10_1Berlin\Bin folder into the Delphi 10.1 Berlin bin folder. Copy all the files from the ImageKit10 VCL Delphi10_1Berlin\Lib\Win64 folder into the Delphi 10.1 Berlin lib\win64\release folder. Copy all the files from the ImageKit10 VCL Delphi10_1Berlin\Lib\Win32 folder into the Delphi 10.1 Berlin lib\win32\release folder. Copy all the files from the ImageKit10 VCL Delphi10_1Berlin\System\Win64 folder into the Windows\System32 folder. Copy all the files from the ImageKit10 VCL Delphi10_1Berlin\System\Win32 folder into the Windows\SysWOW64 folder.
2. Run Delphi 10.1 Berlin (or Embarcadero RAD Studio 10.1 Berlin) and select "Component" - "Install Package" menu.
3. In Design Time Packages, click the "Add" button and select the DclIk10D24.bpl, DclIk10ThumbD24.bpl, and DclIk10WebCamD24.bpl files that you copied to the Delphi 10.1 Berlin bin folder. Select the "Open" button. This will register the design time packages. If successful, the runtime packages will also be registered. Select the [OK] button and close the dialog. The ImageKit icon will appear in the tool palette.
Installing in 32 bit Windows:
The procedure is the same as above except that it isn't necessary to copy files from the ImageKit10 VCL Delphi10_1Berlin\Lib\Win64 folder or the ImageKit10 VCL Delphi10_1Berlin\System\Win64 folder. Also, the files in the ImageKit10 VCL Delphi10_1Berlin\System\Win32 folder should be copied to the Windows\System32 folder.
Delphi 10 Seattle:
Installing in 64 bit Windows:
The "ImageKit10 VCL Delphi 10 Seattle" refers to the directory where the ImageKit10 VCL Delphi 10 Seattle is installed.
1. Copy all of the files from the ImageKit10 VCL Delphi10Seattle\Bin folder into the Delphi 10 Seattle bin folder. Copy all the files from the ImageKit10 VCL Delphi10Seattle\Lib\Win64 folder into the Delphi 10 Seattle lib\win64\release folder. Copy all the files from the ImageKit10 VCL Delphi10Seattle\Lib\Win32 folder into the Delphi 10 Seattle lib\win32\release folder. Copy all the files from the ImageKit10 VCL Delphi10Settle\System\Win64 folder into the Windows\System32 folder. Copy all the files from the ImageKit10 VCL Delphi10Seattle\System\Win32 folder into the Windows\SysWOW64 folder.
2. Run Delphi 10 Seattle (or Embarcadero RAD Studio 10 Seattle) and select "Component" - "Install Package" menu.
3. In Design Time Packages, click the "Add" button and select the DclIk10D23.bpl, DclIk10ThumbD23.bpl, and DclIk10WebCamD23.bpl files that you copied to the Delphi 10 Seattle bin folder. Select the "Open" button. This will register the design time packages. If successful, the runtime packages will also be registered. Select the [OK] button and close the dialog. The ImageKit icon will appear in the tool palette.
Installing in 32 bit Windows:
The procedure is the same as above except that it isn't necessary to copy files from the ImageKit10 VCL Delphi10Seattle\Lib\Win64 folder or the ImageKit10 VCL Delphi10Seattle\System\Win64 folder. Also, the files in the ImageKit10 VCL Delphi10Seattle\System\Win32 folder should be copied to the Windows\System32 folder.
Delphi XE8:
Installing in 64 bit Windows:
The "ImageKit10 VCL DelphiXE8" refers to the directory where the ImageKit10 VCL DelphiXE8 is installed.
1. Copy all of the files from the ImageKit10 VCL DelphiXE8\Bin folder into the Delphi XE8 bin folder. Copy all the files from the ImageKit10 VCL DelphiXE8\Lib\Win64 folder into the Delphi XE8 lib\win64\release folder. Copy all the files from the ImageKit10 VCL DelphiXE8\Lib\Win32 folder into the Delphi XE8 lib\win32\release folder. Copy all the files from the ImageKit10 VCL DelphiXE8\System\Win64 folder into the Windows\System32 folder. Copy all the files from the ImageKit10 VCL DelphiXE8\System\Win32 folder into the Windows\SysWOW64 folder.
2. Run Delphi XE8 (or Embarcadero RAD Studio XE8) and select "Component" - "Install Package" menu.
3. In Design Time Packages, click the "Add" button and select the DclIk10D22.bpl, DclIk10ThumbD22.bpl, and DclIk10WebCamD22.bpl files that you copied to the Delphi XE8 bin folder. Select the "Open" button. This will register the design time packages. If successful, the runtime packages will also be registered. Select the [OK] button and close the dialog. The ImageKit icon will appear in the tool palette.
Installing in 32 bit Windows:
The procedure is the same as above except that it isn't necessary to copy files from the ImageKit10 VCL DelphiXE8\Lib\Win64 folder or the ImageKit10 VCL DelphiXE8\System\Win64 folder. Also, the files in the ImageKit10 VCL DelphiXE8\System\Win32 folder should be copied to the Windows\System32 folder.
Delphi XE7:
Installing in 64 bit Windows:
The "ImageKit10 VCL DelphiXE7" refers to the directory where the ImageKit10 VCL DelphiXE7 is installed.
1. Copy all of the files from the ImageKit10 VCL DelphiXE7\Bin folder into the Delphi XE7 bin folder. Copy all the files from the ImageKit10 VCL DelphiXE7\Lib\Win64 folder into the Delphi XE7 lib\win64\release folder. Copy all the files from the ImageKit10 VCL DelphiXE7\Lib\Win32 folder into the Delphi XE7 lib\win32\release folder. Copy all the files from the ImageKit10 VCL DelphiXE7\System\Win64 folder into the Windows\System32 folder. Copy all the files from the ImageKit10 VCL DelphiXE7\System\Win32 folder into the Windows\SysWOW64 folder.
2. Run Delphi XE7 (or Embarcadero RAD Studio XE7) and select "Component" - "Install Package" menu.
3. In Design Time Packages, click the "Add" button and select the DclIk10D21.bpl, DclIk10ThumbD21.bpl, and DclIk10WebCamD21.bpl files that you copied to the Delphi XE7 bin folder. Select the "Open" button. This will register the design time packages. If successful, the runtime packages will also be registered. Select the [OK] button and close the dialog. The ImageKit icon will appear in the tool palette.
Installing in 32 bit Windows:
The procedure is the same as above except that it isn't necessary to copy files from the ImageKit10 VCL DelphiXE7\Lib\Win64 folder or the ImageKit10 VCL DelphiXE7\System\Win64 folder. Also, the files in the ImageKit10 VCL DelphiXE7\System\Win32 folder should be copied to the Windows\System32 folder.
Delphi XE6:
Installing in 64 bit Windows:
The "ImageKit10 VCL DelphiXE6" refers to the directory where the ImageKit10 VCL DelphiXE6 is installed.
1. Copy all of the files from the ImageKit10 VCL DelphiXE6\Bin folder into the Delphi XE6 bin folder. Copy all the files from the ImageKit10 VCL DelphiXE6\Lib\Win64 folder into the Delphi XE6 lib\win64\release folder. Copy all the files from the ImageKit10 VCL DelphiXE6\Lib\Win32 folder into the Delphi XE6 lib\win32\release folder. Copy all the files from the ImageKit10 VCL DelphiXE6\System\Win64 folder into the Windows\System32 folder. Copy all the files from the ImageKit10 VCL DelphiXE6\System\Win32 folder into the Windows\SysWOW64 folder.
2. Run Delphi XE6 (or Embarcadero RAD Studio XE6) and select "Component" - "Install Package" menu.
3. In Design Time Packages, click the "Add" button and select the DclIk10D20.bpl, DclIk10ThumbD20.bpl, and DclIk10WebCamD20.bpl files that you copied to the Delphi XE6 bin folder. Select the "Open" button. This will register the design time packages. If successful, the runtime packages will also be registered. Select the [OK] button and close the dialog. The ImageKit icon will appear in the tool palette.
Installing in 32 bit Windows:
The procedure is the same as above except that it isn't necessary to copy files from the ImageKit10 VCL DelphiXE6\Lib\Win64 folder or the ImageKit10 VCL DelphiXE6\System\Win64 folder. Also, the files in the ImageKit10 VCL DelphiXE6\System\Win32 folder should be copied to the Windows\System32 folder.
Delphi XE5:
Installing in 64 bit Windows:
The "ImageKit10 VCL DelphiXE5" refers to the directory where the ImageKit10 VCL DelphiXE5 is installed.
1. Copy all of the files from the ImageKit10 VCL DelphiXE5\Bin folder into the Delphi XE5 bin folder. Copy all the files from the ImageKit10 VCL DelphiXE5\Lib\Win64 folder into the Delphi XE5 lib\win64\release folder. Copy all the files from the ImageKit10 VCL DelphiXE5\Lib\Win32 folder into the Delphi XE5 lib\win32\release folder. Copy all the files from the ImageKit10 VCL DelphiXE5\System\Win64 folder into the Windows\System32 folder. Copy all the files from the ImageKit10 VCL DelphiXE5\System\Win32 folder into the Windows\SysWOW64 folder.
2. Run Delphi XE5 (or Embarcadero RAD Studio XE5) and select "Component" - "Install Package" menu.
3. In Design Time Packages, click the "Add" button and select the DclIk10D19.bpl, DclIk10ThumbD19.bpl, and DclIk10WebCamD19.bpl files that you copied to the Delphi XE5 bin folder. Select the "Open" button. This will register the design time packages. If successful, the runtime packages will also be registered. Select the [OK] button and close the dialog. The ImageKit icon will appear in the tool palette.
Installing in 32 bit Windows:
The procedure is the same as above except that it isn't necessary to copy files from the ImageKit10 VCL DelphiXE5\Lib\Win64 folder or the ImageKit10 VCL DelphiXE5\System\Win64 folder. Also, the files in the ImageKit10 VCL DelphiXE5\System\Win32 folder should be copied to the Windows\System32 folder.
Delphi XE4:
Installing in 64 bit Windows:
The "ImageKit10 VCL DelphiXE4" refers to the directory where the ImageKit10 VCL DelphiXE4 is installed.
1. Copy all of the files from the ImageKit10 VCL DelphiXE4\Bin folder into the Delphi XE4 bin folder. Copy all the files from the ImageKit10 VCL DelphiXE4\Lib\Win64 folder into the Delphi XE4 lib\win64\release folder. Copy all the files from the ImageKit10 VCL DelphiXE4\Lib\Win32 folder into the Delphi XE4 lib\win32\release folder. Copy all the files from the ImageKit10 VCL DelphiXE4\System\Win64 folder into the Windows\System32 folder. Copy all the files from the ImageKit10 VCL DelphiXE4\System\Win32 folder into the Windows\SysWOW64 folder.
2. Run Delphi XE4 (or Embarcadero RAD Studio XE4) and select "Component" - "Install Package" menu.
3. In Design Time Packages, click the "Add" button and select the DclIk10D18.bpl, DclIk10ThumbD18.bpl, and DclIk10WebCamD18.bpl files that you copied to the Delphi XE4 bin folder. Select the "Open" button. This will register the design time packages. If successful, the runtime packages will also be registered. Select the [OK] button and close the dialog. The ImageKit icon will appear in the tool palette.
Installing in 32 bit Windows:
The procedure is the same as above except that it isn't necessary to copy files from the ImageKit10 VCL DelphiXE4\Lib\Win64 folder or the ImageKit10 VCL DelphiXE4\System\Win64 folder. Also, the files in the ImageKit10 VCL DelphiXE4\System\Win32 folder should be copied to the Windows\System32 folder.
Delphi XE3:
Installing in 64 bit Windows:
The "ImageKit10 VCL DelphiXE3" refers to the directory where the ImageKit10 VCL DelphiXE3 is installed.
1. Copy all of the files from the ImageKit10 VCL DelphiXE3\Bin folder into the Delphi XE3 bin folder. Copy all the files from the ImageKit10 VCL DelphiXE3\Lib\Win64 folder into the Delphi XE3 lib\win64\release folder. Copy all the files from the ImageKit10 VCL DelphiXE3\Lib\Win32 folder into the Delphi XE3 lib\win32\release folder. Copy all the files from the ImageKit10 VCL DelphiXE3\System\Win64 folder into the Windows\System32 folder. Copy all the files from the ImageKit10 VCL DelphiXE3\System\Win32 folder into the Windows\SysWOW64 folder.
2. Run Delphi XE3 (or Embarcadero RAD Studio XE3) and select "Component" - "Install Package" menu.
3. In Design Time Packages, click the "Add" button and select the DclIk10D17.bpl, DclIk10ThumbD17.bpl, and DclIk10WebCamD17.bpl files that you copied to the Delphi XE3 bin folder. Select the "Open" button. This will register the design time packages. If successful, the runtime packages will also be registered. Select the [OK] button and close the dialog. The ImageKit icon will appear in the tool palette.
Installing in 32 bit Windows:
The procedure is the same as above except that it isn't necessary to copy files from the ImageKit10 VCL DelphiXE3\Lib\Win64 folder or the ImageKit10 VCL DelphiXE3\System\Win64 folder. Also, the files in the ImageKit10 VCL DelphiXE3\System\Win32 folder should be copied to the Windows\System32 folder.
C++Builder 12 Athens:
Installing in 64 bit Windows:
The "ImageKit10 VCL C++Builder 12 Athens" refers to the directory where the ImageKit10 VCL C++Builder12Athens is installed.
1. Copy all of the files from the ImageKit10 VCL C++Builder12Athens\Bin folder into the C++Builder 12 Athens bin folder. Copy all of the files from the ImageKit10 VCL C++Builder12Athens\Bin64 folder into the C++Builder 12 Athens bin64 folder. Copy all the files from the ImageKit10 VCL C++Builder12Athens\Include folder into the C++Builder 12 Athens include\windows\vcl folder. Copy all the files from the ImageKit10 VCL C++Builder12Athens\Lib\Win64 folder into the C++Builder 12 Athens lib\win64\release folder. Copy all the files from the ImageKit10 VCL C++Builder12Athens\Lib\Win32 folder into the C++Builder 12 Athens lib\win32\release folder. Copy the files from the `C++Builder12Athens\Lib\Win64x` folder to the `lib\win64x\release` folder of `C++Builder 12 Athens` Copy all the files from the ImageKit10 VCL C++Builder12Athens\System\Win64 folder into the Windows\System folder. Copy all the files from the ImageKit10 VCL C++Builder12Athens\System\Win32 folder into the Windows\SysWOW64 folder.
2. Run C++Builder 12 Athens (or Embarcadero RAD Studio 11 Alexandria) and select "Component" - "Install Package" menu.
3. In Design Time Packages, click the "Add" button and select the DclIk10D29.bpl, DclIk10ThumbD29.bpl, and DclIk10WebCamD29.bpl files that you copied to the C++Builder 12 Athens bin folder. Select the "Open" button. This will register the design time packages. If successful, the runtime packages will also be registered. Select the [OK] button and close the dialog. The ImageKit icon will appear in the tool palette.
If you are using the 64-bit IDE, include the following steps:
5. StartIf you are using the 64-bit IDE, include the following steps:
5. Start C++Builder 12 Athens (64-bit) (or Embarcadero RAD Studio 12 Athens (64-bit)) and choose the "Component" - "Install Packages" menu.
6. In “Design-time Packages”, click the “Add (A)” button, specify DclIk10D29.bpl and DclIk10ThumbD29.bpl copied into the bin64 folder of C++Builder 12 Athens, and then click the “Open” button. (If successful, the packages will also be registered in the Run-time Packages.)
7. Click the “OK” button to close the dialog. Icons will then appear under “ImageKit” in the Component Palette.
Installing in 32 bit Windows:
You can follow the same steps as A-1 through A-4, but you do not need to copy the files in C++Builder12Athens\Bin64, C++Builder12Athens\Lib\Win64, or the files contained in C++Builder12Athens\System\Win64. Also, copy the files in C++Builder12Athens\System\Win32 into the Windows system folder.
C++Builder 11 Alexandria
"ImageKit10 VCL C++Builder 11 Alexandria" refers to the directory where the ImageKit10 VCL C++Builder11Alexandria is installed.
1. Copy all of the files from the ImageKit10 VCL C++Builder11Alexandria\Bin folder into the C++Builder 11 Alexandria bin folder. Copy all the files from the ImageKit10 VCL C++Builder11Alexandria\Include folder into the C++Builder 11 Alexandria include\windows\vcl folder. Copy all the files from the ImageKit10 VCL C++Builder11Alexandria\Lib\Win64 folder into the C++Builder 11 Alexandria lib\win64\release folder. Copy all the files from the ImageKit10 VCL C++Builder11Alexandria\Lib\Win32 folder into the C++Builder 11 Alexandria lib\win32\release folder. Copy all the files from the ImageKit10 VCL C++Builder11Alexandria\System\Win64 folder into the Windows\System folder. Copy all the files from the ImageKit10 VCL C++Builder11Alexandria\System\Win32 folder into the Windows\SysWOW64 folder.
2. Run C++Builder 11 Alexandria (or Embarcadero RAD Studio 11 Alexandria) and select "Component" - "Install Package" menu.
3. In Design Time Packages, click the "Add" button and select the DclIk10D28.bpl, DclIk10ThumbD28.bpl, and DclIk10WebCamD28.bpl files that you copied to the C++Builder 11 Alexandria bin folder. Select the "Open" button. This will register the design time packages. If successful, the runtime packages will also be registered. Select the [OK] button and close the dialog. The ImageKit icon will appear in the tool palette.
Installing in 32 bit Windows:
The procedure is the same as above except that it isn't necessary to copy files from the ImageKit10 VCL C++Builder11Alexandria\Lib\Win64 folder or the ImageKit10 VCL C++Builder11Alexandria\System\Win64 folder. Also, the files in the ImageKit10 VCL C++Builder11Alexandria\System\Win32 folder should be copied to the Windows\System folder.
C++Builder 10.4 Sydney:
Installing in 64 bit Windows:
The "ImageKit10 VCL C++Builder 10.4 Sydney" refers to the directory where the ImageKit10 VCL C++Builder10_4Sydney is installed.
1. Copy all of the files from the ImageKit10 VCL C++Builder10_4Sydney\Bin folder into the C++Builder 10.4 Sydney bin folder. Copy all the files from the ImageKit10 VCL C++Builder10_4Sydney\Include folder into the C++Builder 10.4 Sydney include\windows\vcl folder. Copy all the files from the ImageKit10 VCL C++Builder10_4Sydney\Lib\Win64 folder into the C++Builder 10.4 Sydney lib\win64\release folder. Copy all the files from the ImageKit10 VCL C++Builder10_4Sydney\Lib\Win32 folder into the C++Builder 10.4 Sydney lib\win32\release folder. Copy all the files from the ImageKit10 VCL C++Builder10_4Sydney\System\Win64 folder into the Windows\System32 folder. Copy all the files from the ImageKit10 VCL C++Builder10_4Sydney\System\Win32 folder into the Windows\SysWOW64 folder.
2. Run C++Builder 10.4 Sydney (or Embarcadero RAD Studio 10.4 Sydney) and select "Component" - "Install Package" menu.
3. In Design Time Packages, click the "Add" button and select the DclIk10D27.bpl, DclIk10ThumbD27.bpl, and DclIk10WebCamD27.bpl files that you copied to the C++Builder 10.4 Sydney bin folder. Select the "Open" button. This will register the design time packages. If successful, the runtime packages will also be registered. Select the [OK] button and close the dialog. The ImageKit icon will appear in the tool palette.
Installing in 32 bit Windows:
The procedure is the same as above except that it isn't necessary to copy files from the ImageKit10 VCL C++Builder10_4Sydney\Lib\Win64 folder or the ImageKit10 VCL C++Builder10_4Sydney\System\Win64 folder. Also, the files in the ImageKit10 VCL C++Builder10_4Sydney\System\Win32 folder should be copied to the Windows\System32 folder.
C++Builder 10.3 Rio:
Installing in 64 bit Windows:
The "ImageKit10 VCL C++Builder 10.3 Rio" refers to the directory where the ImageKit10 VCL C++Builder10_3Rio is installed.
1. Copy all of the files from the ImageKit10 VCL C++Builder10_3Rio\Bin folder into the C++Builder 10.3 Rio bin folder. Copy all the files from the ImageKit10 VCL C++Builder10_3Rio\Include folder into the C++Builder 10.3 Rio include\windows\vcl folder. Copy all the files from the ImageKit10 VCL C++Builder10_3Rio\Lib\Win64 folder into the C++Builder 10.3 Rio lib\win64\release folder. Copy all the files from the ImageKit10 VCL C++Builder10_3Rio\Lib\Win32 folder into the C++Builder 10.3 Rio lib\win32\release folder. Copy all the files from the ImageKit10 VCL C++Builder10_3Rio\System\Win64 folder into the Windows\System32 folder. Copy all the files from the ImageKit10 VCL C++Builder10_3Rio\System\Win32 folder into the Windows\SysWOW64 folder.
2. Run C++Builder 10.3 Rio (or Embarcadero RAD Studio 10.3 Rio) and select "Component" - "Install Package" menu.
3. In Design Time Packages, click the "Add" button and select the DclIk10D26.bpl, DclIk10ThumbD26.bpl, and DclIk10WebCamD26.bpl files that you copied to the C++Builder 10.3 Rio bin folder. Select the "Open" button. This will register the design time packages. If successful, the runtime packages will also be registered. Select the [OK] button and close the dialog. The ImageKit icon will appear in the tool palette.
Installing in 32 bit Windows:
The procedure is the same as above except that it isn't necessary to copy files from the ImageKit10 VCL C++Builder10_3Rio\Lib\Win64 folder or the ImageKit10 VCL C++Builder10_3Rio\System\Win64 folder. Also, the files in the ImageKit10 VCL C++Builder10_3Rio\System\Win32 folder should be copied to the Windows\System32 folder.
C++Builder 10.2 Tokyo:
Installing in 64 bit Windows:
The "ImageKit10 VCL C++Builder 10.2 Tokyo" refers to the directory where the ImageKit10 VCL C++Builder10_2Tokyo is installed.
1. Copy all of the files from the ImageKit10 VCL C++Builder10_2Tokyo\Bin folder into the C++Builder 10.2 Tokyo bin folder. Copy all the files from the ImageKit10 VCL C++Builder10_2Tokyo\Include folder into the C++Builder 10.2 Tokyo include\windows\vcl folder. Copy all the files from the ImageKit10 VCL C++Builder10_2Tokyo\Lib\Win64 folder into the C++Builder 10.2 Tokyo lib\win64\release folder. Copy all the files from the ImageKit10 VCL C++Builder10_2Tokyo\Lib\Win32 folder into the C++Builder 10.2 Tokyo lib\win32\release folder. Copy all the files from the ImageKit10 VCL C++Builder10_2Tokyo\System\Win64 folder into the Windows\System32 folder. Copy all the files from the ImageKit10 VCL C++Builder10_2Tokyo\System\Win32 folder into the Windows\SysWOW64 folder.
2. Run C++Builder 10.2 Tokyo (or Embarcadero RAD Studio 10.2 Tokyo) and select "Component" - "Install Package" menu.
3. In Design Time Packages, click the "Add" button and select the DclIk10D25.bpl, DclIk10ThumbD25.bpl, and DclIk10WebCamD25.bpl files that you copied to the C++Builder 10.2 Tokyo bin folder. Select the "Open" button. This will register the design time packages. If successful, the runtime packages will also be registered. Select the [OK] button and close the dialog. The ImageKit icon will appear in the tool palette.
Installing in 32 bit Windows:
The procedure is the same as above except that it isn't necessary to copy files from the ImageKit10 VCL C++Builder10_2Tokyo\Lib\Win64 folder or the ImageKit10 VCL C++Builder10_2Tokyo\System\Win64 folder. Also, the files in the ImageKit10 VCL C++Builder10_2Tokyo\System\Win32 folder should be copied to the Windows\System32 folder.
C++Builder 10.1 Berlin:
Installing in 64 bit Windows:
The "ImageKit10 VCL C++Builder 10.1 Berlin" refers to the directory where the ImageKit10 VCL C++Builder10_1Berlin is installed.
1. Copy all of the files from the ImageKit10 VCL C++Builder10_1Berlin\Bin folder into the C++Builder 10.1 Berlin bin folder. Copy all the files from the ImageKit10 VCL C++Builder10_1Berlin\Include folder into the C++Builder 10.1 Berlin include\windows\vcl folder. Copy all the files from the ImageKit10 VCL C++Builder10_1Berlin\Lib\Win64 folder into the C++Builder 10.1 Berlin lib\win64\release folder. Copy all the files from the ImageKit10 VCL C++Builder10_1Berlin\Lib\Win32 folder into the C++Builder 10.1 Berlin lib\win32\release folder. Copy all the files from the ImageKit10 VCL C++Builder10_1Berlin\System\Win64 folder into the Windows\System32 folder. Copy all the files from the ImageKit10 VCL C++Builder10_1Berlin\System\Win32 folder into the Windows\SysWOW64 folder.
2. Run C++Builder 10.1 Berlin (or Embarcadero RAD Studio 10.1 Berlin) and select "Component" - "Install Package" menu.
3. In Design Time Packages, click the "Add" button and select the DclIk10D24.bpl, DclIk10ThumbD24.bpl, and DclIk10WebCamD24.bpl files that you copied to the C++Builder 10.1 Berlin bin folder. Select the "Open" button. This will register the design time packages. If successful, the runtime packages will also be registered. Select the [OK] button and close the dialog. The ImageKit icon will appear in the tool palette.
Installing in 32 bit Windows:
The procedure is the same as above except that it isn't necessary to copy files from the ImageKit10 VCL C++Builder10_1Berlin\Lib\Win64 folder or the ImageKit10 VCL C++Builder10_1Berlin\System\Win64 folder. Also, the files in the ImageKit10 VCL C++Builder10_1Berlin\System\Win32 folder should be copied to the Windows\System32 folder.
C++Builder 10 Seattle:
Installing in 64 bit Windows:
The "ImageKit10 VCL C++Builder 10 Seattle" refers to the directory where the ImageKit10 VCL C++Builder10Seattle is installed.
1. Copy all of the files from the ImageKit10 VCL C++Builder10Seattle\Bin folder into the C++Builder 10 Seattle bin folder. Copy all the files from the ImageKit10 VCL C++Builder10Seattle\Include folder into the C++Builder 10 Seattle include\windows\vcl folder. Copy all the files from the ImageKit10 VCL C++Builder10Seattle\Lib\Win64 folder into the C++Builder 10 Seattle lib\win64\release folder. Copy all the files from the ImageKit10 VCL C++Builder10Seattle\Lib\Win32 folder into the C++Builder 10 Seattle lib\win32\release folder. Copy all the files from the ImageKit10 VCL C++Builder10Seattle\System\Win64 folder into the Windows\System32 folder. Copy all the files from the ImageKit10 VCL C++Builder10Seattle\System\Win32 folder into the Windows\SysWOW64 folder.
2. Run C++Builder 10 Seattle (or Embarcadero RAD Studio 10 Seattle) and select "Component" - "Install Package" menu.
3. In Design Time Packages, click the "Add" button and select the DclIk10D23.bpl, DclIk10ThumbD23.bpl, and DclIk10WebCamD23.bpl files that you copied to the C++Builder 10 Seattle bin folder. Select the "Open" button. This will register the design time packages. If successful, the runtime packages will also be registered. Select the [OK] button and close the dialog. The ImageKit icon will appear in the tool palette.
Installing in 32 bit Windows:
The procedure is the same as above except that it isn't necessary to copy files from the ImageKit10 VCL C++Builder10Seattle\Lib\Win64 folder or the ImageKit10 VCL C++Builder10Seattle\System\Win64 folder. Also, the files in the ImageKit10 VCL C++Builder10Seattle\System\Win32 folder should be copied to the Windows\System32 folder.
C++Builder XE8:
Installing in 64 bit Windows:
The "ImageKit10 VCL C++BuilderXE8" refers to the directory where the ImageKit10 VCL C++BuilderXE8 is installed.
1. Copy all of the files from the ImageKit10 VCL C++BuilderXE8\Bin folder into the C++Builder XE8 bin folder. Copy all the files from the ImageKit10 VCL C++BuilderXE8\Include folder into the C++Builder XE8 include\windows\vcl folder. Copy all the files from the ImageKit10 VCL C++BuilderXE8\Lib\Win64 folder into the C++Builder XE8 lib\win64\release folder. Copy all the files from the ImageKit10 VCL C++BuilderXE8\Lib\Win32 folder into the C++Builder XE8 lib\win32\release folder. Copy all the files from the ImageKit10 VCL C++BuilderXE8\System\Win64 folder into the Windows\System32 folder. Copy all the files from the ImageKit10 VCL C++BuilderXE8\System\Win32 folder into the Windows\SysWOW64 folder.
2. Run C++Builder XE8 (or Embarcadero RAD Studio XE8) and select "Component" - "Install Package" menu.
3. In Design Time Packages, click the "Add" button and select the DclIk10D22.bpl, DclIk10ThumbD22.bpl, and DclIk10WebCamD22.bpl files that you copied to the C++Builder XE8 bin folder. Select the "Open" button. This will register the design time packages. If successful, the runtime packages will also be registered. Select the [OK] button and close the dialog. The ImageKit icon will appear in the tool palette.
Installing in 32 bit Windows:
The procedure is the same as above except that it isn't necessary to copy files from the ImageKit10 VCL C++BuilderXE8\Lib\Win64 folder or the ImageKit10 VCL C++BuilderXE8\System\Win64 folder. Also, the files in the ImageKit10 VCL C++BuilderXE8\System\Win32 folder should be copied to the Windows\System32 folder.
C++Builder XE7:
Installing in 64 bit Windows:
The "ImageKit10 VCL C++BuilderXE7" refers to the directory where the ImageKit10 VCL C++BuilderXE7 is installed.
1. Copy all of the files from the ImageKit10 VCL C++BuilderXE7\Bin folder into the C++Builder XE7 bin folder. Copy all the files from the ImageKit10 VCL C++BuilderXE7\Include folder into the C++Builder XE7 include\windows\vcl folder. Copy all the files from the ImageKit10 VCL C++BuilderXE7\Lib\Win64 folder into the C++Builder XE7 lib\win64\release folder. Copy all the files from the ImageKit10 VCL C++BuilderXE7\Lib\Win32 folder into the C++Builder XE7 lib\win32\release folder. Copy all the files from the ImageKit10 VCL C++BuilderXE7\System\Win64 folder into the Windows\System32 folder. Copy all the files from the ImageKit10 VCL C++BuilderXE7\System\Win32 folder into the Windows\SysWOW64 folder.
2. Run C++Builder XE7 (or Embarcadero RAD Studio XE7) and select "Component" - "Install Package" menu.
3. In Design Time Packages, click the "Add" button and select the DclIk10D21.bpl, DclIk10ThumbD21.bpl, and DclIk10WebCamD21.bpl files that you copied to the C++Builder XE7 bin folder. Select the "Open" button. This will register the design time packages. If successful, the runtime packages will also be registered. Select the [OK] button and close the dialog. The ImageKit icon will appear in the tool palette.
Installing in 32 bit Windows:
The procedure is the same as above except that it isn't necessary to copy files from the ImageKit10 VCL C++BuilderXE7\Lib\Win64 folder or the ImageKit10 VCL C++BuilderXE7\System\Win64 folder. Also, the files in the ImageKit10 VCL C++BuilderXE7\System\Win32 folder should be copied to the Windows\System32 folder.
C++Builder XE6:
Installing in 64 bit Windows:
The "ImageKit10 VCL C++BuilderXE6" refers to the directory where the ImageKit10 VCL C++BuilderXE6 is installed.
1. Copy all of the files from the ImageKit10 VCL C++BuilderXE6\Bin folder into the C++Builder XE6 bin folder. Copy all the files from the ImageKit10 VCL C++BuilderXE6\Include folder into the C++Builder XE6 include\windows\vcl folder. Copy all the files from the ImageKit10 VCL C++BuilderXE6\Lib\Win64 folder into the C++Builder XE6 lib\win64\release folder. Copy all the files from the ImageKit10 VCL C++BuilderXE6\Lib\Win32 folder into the C++Builder XE6 lib\win32\release folder. Copy all the files from the ImageKit10 VCL C++BuilderXE6\System\Win64 folder into the Windows\System32 folder. Copy all the files from the ImageKit10 VCL C++BuilderXE6\System\Win32 folder into the Windows\SysWOW64 folder.
2. Run C++Builder XE6 (or Embarcadero RAD Studio XE6) and select "Component" - "Install Package" menu.
3. In Design Time Packages, click the "Add" button and select the DclIk10D20.bpl, DclIk10ThumbD20.bpl, and DclIk10WebCamD20.bpl files that you copied to the C++Builder XE6 bin folder. Select the "Open" button. This will register the design time packages. If successful, the runtime packages will also be registered. Select the [OK] button and close the dialog. The ImageKit icon will appear in the tool palette.
Installing in 32 bit Windows:
The procedure is the same as above except that it isn't necessary to copy files from the ImageKit10 VCL C++BuilderXE6\Lib\Win64 folder or the ImageKit10 VCL C++BuilderXE6\System\Win64 folder. Also, the files in the ImageKit10 VCL C++BuilderXE6\System\Win32 folder should be copied to the Windows\System32 folder.
C++Builder XE5:
Installing in 64 bit Windows:
The "ImageKit10 VCL C++BuilderXE5" refers to the directory where the ImageKit10 VCL C++BuilderXE5 is installed.
1. Copy all of the files from the ImageKit10 VCL C++BuilderXE5\Bin folder into the C++Builder XE5 bin folder. Copy all the files from the ImageKit10 VCL C++BuilderXE5\Include folder into the C++Builder XE5 include\windows\vcl folder. Copy all the files from the ImageKit10 VCL C++BuilderXE5\Lib\Win64 folder into the C++Builder XE5 lib\win64\release folder. Copy all the files from the ImageKit10 VCL C++BuilderXE5\Lib\Win32 folder into the C++Builder XE5 lib\win32\release folder. Copy all the files from the ImageKit10 VCL C++BuilderXE5\System\Win64 folder into the Windows\System32 folder. Copy all the files from the ImageKit10 VCL C++BuilderXE5\System\Win32 folder into the Windows\SysWOW64 folder.
2. Run C++Builder XE5 (or Embarcadero RAD Studio XE5) and select "Component" - "Install Package" menu.
3. In Design Time Packages, click the "Add" button and select the DclIk10D19.bpl, DclIk10ThumbD19.bpl, and DclIk10WebCamD19.bpl files that you copied to the C++Builder XE5 bin folder. Select the "Open" button. This will register the design time packages. If successful, the runtime packages will also be registered. Select the [OK] button and close the dialog. The ImageKit icon will appear in the tool palette.
Installing in 32 bit Windows:
The procedure is the same as above except that it isn't necessary to copy files from the ImageKit10 VCL C++BuilderXE5\Lib\Win64 folder or the ImageKit10 VCL C++BuilderXE5\System\Win64 folder. Also, the files in the ImageKit10 VCL C++BuilderXE5\System\Win32 folder should be copied to the Windows\System32 folder.
C++Builder XE4:
Installing in 64 bit Windows:
The "ImageKit10 VCL C++BuilderXE4" refers to the directory where the ImageKit10 VCL C++BuilderXE4 is installed.
1. Copy all of the files from the ImageKit10 VCL C++BuilderXE4\Bin folder into the C++Builder XE4 bin folder. Copy all the files from the ImageKit10 VCL C++BuilderXE4\Include folder into the C++Builder XE4 include\windows\vcl folder. Copy all the files from the ImageKit10 VCL C++BuilderXE4\Lib\Win64 folder into the C++Builder XE4 lib\win64\release folder. Copy all the files from the ImageKit10 VCL C++BuilderXE4\Lib\Win32 folder into the C++Builder XE4 lib\win32\release folder. Copy all the files from the ImageKit10 VCL C++BuilderXE4\System\Win64 folder into the Windows\System32 folder. Copy all the files from the ImageKit10 VCL C++BuilderXE4\System\Win32 folder into the Windows\SysWOW64 folder.
2. Run C++Builder XE4 (or Embarcadero RAD Studio XE4) and select "Component" - "Install Package" menu.
3. In Design Time Packages, click the "Add" button and select the DclIk10D18.bpl, DclIk10ThumbD18.bpl, and DclIk10WebCamD18.bpl files that you copied to the C++Builder XE4 bin folder. Select the "Open" button. This will register the design time packages. If successful, the runtime packages will also be registered. Select the [OK] button and close the dialog. The ImageKit icon will appear in the tool palette.
Installing in 32 bit Windows:
The procedure is the same as above except that it isn't necessary to copy files from the ImageKit10 VCL C++BuilderXE4\Lib\Win64 folder or the ImageKit10 VCL C++BuilderXE4\System\Win64 folder. Also, the files in the ImageKit10 VCL C++BuilderXE4\System\Win32 folder should be copied to the Windows\System32 folder.
C++Builder XE3:
Installing in 64 bit Windows:
The "ImageKit10 VCL C++BuilderXE3" refers to the directory where the ImageKit10 VCL C++BuilderXE3 is installed.
1. Copy all of the files from the ImageKit10 VCL C++BuilderXE3\Bin folder into the C++Builder XE3 bin folder. Copy all the files from the ImageKit10 VCL C++BuilderXE3\Include folder into the C++Builder XE3 include\windows\vcl folder. Copy all the files from the ImageKit10 VCL C++BuilderXE3\Lib\Win64 folder into the C++Builder XE3 lib\win64\release folder. Copy all the files from the ImageKit10 VCL C++BuilderXE3\Lib\Win32 folder into the C++Builder XE3 lib\win32\release folder. Copy all the files from the ImageKit10 VCL C++BuilderXE3\System\Win64 folder into the Windows\System32 folder. Copy all the files from the ImageKit10 VCL C++BuilderXE3\System\Win32 folder into the Windows\SysWOW64 folder.
2. Run C++Builder XE3 (or Embarcadero RAD Studio XE3) and select "Component" - "Install Package" menu.
3. In Design Time Packages, click the "Add" button and select the DclIk10D17.bpl, DclIk10ThumbD17.bpl, and DclIk10WebCamD17.bpl files that you copied to the C++Builder XE3 bin folder. Select the "Open" button. This will register the design time packages. If successful, the runtime packages will also be registered. Select the [OK] button and close the dialog. The ImageKit icon will appear in the tool palette.
Installing in 32 bit Windows:
The procedure is the same as above except that it isn't necessary to copy files from the ImageKit10 VCL C++BuilderXE3\Lib\Win64 folder or the ImageKit10 VCL C++BuilderXE3\System\Win64 folder. Also, the files in the ImageKit10 VCL C++BuilderXE3\System\Win32 folder should be copied to the Windows\System32 folder.
C++Builder XE2:
The "ImageKit10 VCL C++BuilderXE2" refers to the directory where the ImageKit10 VCL C++BuilderXE2 is installed.
1. Copy all of the files from the ImageKit10 VCL C++BuilderXE2\Bin folder into the C++Builder XE2 bin folder. Copy all the files from the ImageKit10 VCL C++BuilderXE2\Include folder into the C++Builder XE2 include\windows\vcl folder. Copy all the files from the ImageKit10 VCL C++BuilderXE2\Lib folder into the C++Builder XE2 lib\win32\release folder. Copy all the files from the ImageKit10 VCL C++BuilderXE2\System folder into the Windows\System32 folder on a 32 bit Windows operating system. On a 64 bit Windows operating system this is the Windows\SysWOW64 folder.
2. Run C++Builder XE2 (or Embarcadero RAD Studio XE2) and select "Component" - "Install Package" menu.
3. In Design Time Packages, click the "Add" button and select the DclIk10D16.bpl, DclIk10ThumbD16.bpl, and DclIk10WebCamD16.bpl files that you copied to the C++Builder XE2 bin folder. Select the "Open" button. This will register the design time packages. If successful, the runtime packages will also be registered. Select the [OK] button and close the dialog. The ImageKit icon will appear in the tool palette.
C++Builder XE:
The "ImageKit10 VCL C++BuilderXE" refers to the directory where the ImageKit10 VCL C++BuilderXE is installed.
1. Copy all of the files from the ImageKit10 VCL C++BuilderXE\Bin folder into the C++Builder XE bin folder. Copy all the files from the ImageKit10 VCL C++BuilderXE\Include folder into the C++Builder XE include\windows\rtl folder. Copy all the files from the ImageKit10 VCL C++BuilderXE\Lib folder into the C++Builder XE lib\win32\release folder. Copy all the files from the ImageKit10 VCL C++BuilderXE\System folder into the Windows\System32 folder on a 32 bit Windows operating system. On a 64 bit Windows operating system this is the Windows\SysWOW64 folder.
2. Run C++Builder XE (or Embarcadero RAD Studio XE) and select "Component" - "Install Package" menu.
3. In Design Time Packages, click the "Add" button and select the DclIk10D15.bpl, DclIk10ThumbD15.bpl, and DclIk10WebCamD15.bpl files that you copied to the C++Builder XE bin folder. Select the "Open" button. This will register the design time packages. If successful, the runtime packages will also be registered. Select the [OK] button and close the dialog. The ImageKit icon will appear in the tool palette.
C++Builder 2010:
The "ImageKit10 VCL C++Builder2010" refers to the directory where the ImageKit10 VCL C++Builder2010 is installed.
1. Copy all of the files from the ImageKit10 VCL C++Builder2010\Bin folder into the C++Builder 2010 bin folder. Copy all the files from the ImageKit10 VCL C++Builder2010\Include folder into the C++Builder 2010 include folder. Copy all the files from the ImageKit10 VCL C++Builder2010\Lib folder into the C++Builder 2010 lib folder. Copy all the files from the ImageKit10 VCL C++Builder2010\System folder into the Windows\System32 folder on a 32 bit Windows operating system. On a 64 bit Windows operating system this is the Windows\SysWOW64 folder.
2. Run C++Builder 2010 (or Embarcadero RAD Studio 2010) and select "Component" - "Install Package" menu.
3. In Design Time Packages, click the "Add" button and select the DclIk10D14.bpl, DclIk10ThumbD14.bpl, and DclIk10WebCamD14.bpl files that you copied to the C++Builder 2010 bin folder. Select the "Open" button. This will register the design time packages. If successful, the runtime packages will also be registered. Select the [OK] button and close the dialog. The ImageKit icon will appear in the tool palette.
Build Version
The ImageKit10 VCL was built in the following environments:
Delphi 12 Athens Update 2 Patch 1
Delphi 11 Alexandria Delphi 12
Athens Update 3
Delphi 11 Alexandria Update
3sp; Update 3
Delphi 10.2 Tokyo Update 3
Delphi 10.1 Berlin Update 2
Delphi 10 Seattle Subscription
Update 1
Delphi
XE8
Subscription Update 1
Delphi
XE7
Update 1
Delphi
XE6
Update 1
Delphi
XE5
Update 2 Hotfix 5
Delphi
XE4
Update 1
Delphi
XE3
Update 2
C++Builder 12 Athens Update 2 Patch 1
C++Builder 11 Alexandria&nbsC++Builder 12
Athens Update 3
C++Builder 11 Alexandria Update
3nbsp; Update 3
C++Builder 10.2 Tokyo Update 3
C++Builder 10.1 Berlin Update 2
C++Builder 10 Seattle Subscription
Update 1
C++Builder
XE8
Subscription Update 1
C++Builder
XE7
Update 1
C++Builder
XE6
Update 1
C++Builder
XE5
Update 2 Hotfix 5
C++Builder
XE4
Update 1
C++Builder
XE3
Update 2
Updates
Registered users of the ImageKit10 VCL can download updates from our website. After downloading the update, copy the files into their appropriate folders within the development environment without starting up Delphi/C++Builder.
Uninstalling the ImageKit10 VCL
1. To update the ImageKit10 VCL to the latest release: Uninstall the ImageKit10 VCL by executing the "Uninstall a program" from the "Programs And Features" section of the "Control Panel". Next execute the latest ImageKit10 VCL installer. After installation, if needed, overwrite older files with the latest version files.
2. To remove the ImageKit10 from your computer: Before uninstalling the ImageKit10 VCL, remove the ImageKit10 VCL license from your machine. To do that run the License Activation program that ships with the ImageKit10 VCL and choose the "Remove License" option. After the license has been removed, delete the ImageKit10 VCL packages from the VCL developer environment. From the Control Panel, choose "Programs And Features" then "Uninstall a program" and uninstall the ImageKit10 VCL. To remove any related ImageKit10 VCL files completely, you should check that ImageKit10 VCL related package files (file extension .bpl) and dll files are deleted from the Windows\System32 and Windows\SysWOW64 folder. Check to see that the ImageKit10 VCL runtime package files and dlls from the bin, include, and lib folders of your development environment. Files that were updates at 10:00, for example, may have names like; DclIk10*.*, Ik*.hpp, ImageKit*.hpp, Ik*.res, Ik*.dfm, ImageKit*.*, ImgKit10*.dcp.